
I finally did it. My warranty is due in a week and it was time to try something new with my close-to-a-year-old phone. As I mentioned in an update a few days back, my HTC One X began facing reduced battery life after the Jellybean update. Also, many at XDA were encouraging users to root and install third party ROMs that have better performance and battery life. With the warranty close to expiration and nearly nothing to lose, I took the plunge.
I consider myself to be well versed in fixing both hardware and software issues on the PC. I have built systems, repaired malfunctioning hardware, remedied manufacturing flaws on my motherboard and also done nearly everything on the software end. However, this rooting experience was a different ball game. I will be sharing my experience here. This is not a guide because there are already many out there.
Reading Up
There’s a lot to read up if you want to root your phone. The reason for this is because rooting on different devices can be very different. The basic flow goes like this. You unlock the bootloader of the phone. The boot loader is to Android phones what the boot manager is to the PC. Once the bootloader is unlocked, you have to install super user permissions and a custom recovery software. The first allows you to allow apps to take deep level system commands and the other allows you to handle system operations within hboot. Hboot is the first operating layer that is loaded before an operating system. After you have completed all these, then is your phone considered rooted. You have given yourself (and any software you desire) the ability to execute root level (base level) commands to the phone. After that, backing up, installing new ROMs and setting things up can be tedious but is relatively free of technical issues.
You will be told almost all the time to shut up, stop asking and read up.
The process of unlocking and rooting varies from phone to phone. Worse still, it also varies within sub models of the same phone. There are tons of resources available online but it is not uncommon to see a very good guide for the device met with replies of ‘it doesn’t work for me!’. Because there is a strong interest in rooting and the glutch of new Android users (like myself) have hit XDA Forums, experienced users are getting frustrated at having to hand hold the new ones. You will be told almost all the time to shut up, stop asking and read up.
I read up for weeks before trying this. In fact, I did read up a few months ago but all that info became irrelevant when HTC changed certain HBoot attributes in the Jellybean update. The difficult part is when you see two great guides that say opposite things. Armed with little I could trust, I threw caution to the wind and jumped into it.
Unlocking
When you unlock your phone, you are not rooting it. You merely open up the bootloader so that it can be modified and you can execute commands during this phase. Unlocking the phone is rather simple but requires you to have a Windows machine (at least for the HTC One X’s case). You unlock the phone through the HTCDev website, doing so allows the site to identify the phone you are unlocking.

The phone is connected to the PC via a USB cable and you need to install drivers so that the PC can send commands to the phone. After that, you have to boot the phone into HBoot and then use the command line interface on Windows to enter fastboot commands to the phone. The PC will identify the phone with a long string of characters in which you will relay this information to the website via a copy and paste. The site then generates an unlock.bin file which you execute via Window’s command prompt. The phone is then unlocked and HTC keeps a record of your exact phone.
I faced no problems whatsoever at this stage. I have been working off the DOS prompt since the age of 10 and it was just old school and fun to be working that way again. Because HTC gives out official instructions here, the steps are foolproof and well illustrated. Unlocking was a breeze.
Because HTC gives out official instructions here, the steps are foolproof and well illustrated. Unlocking was a breeze.
However, unlocking allows HTC to withdraw parts or even the entire warranty of your phone. Their argument is that by allowing you to unlock, you may install software that can cause hardware damage to the phone. For example, custom software allow you to overclock your processor and if done wrongly you could very well see things go up in smoke. HTC does not want to honour the warranty in this case. As such, I waited till the end of my warranty period to do this.
Rooting
This was the part where I faced a truckload of problems. Judging from XDA forums and other sources, most users face a lot of issues here as well. The issues vary widely from case to case. This is true even though it is the exact same phone model. The 3 different (conflicting yet updated) sources could not offer me a solution and so I had to wing it.
I could not get SuperUser binaries into my phone because the author who created these binaries decided to change the method of delivery (from copying it to the internal SD card) to an app on Google Play which didn’t work for me. Without SuperUser permissions enabled, I was stuck. I had to dig up an outdated post and manually execute it. Thank goodness it worked. This was the stage that took 2-3 hours of Googling around and trying a hundred and one methods. I faced boot loops, nearly soft bricked my phone and was getting very frustrated.
I faced boot loops, nearly soft bricked my phone and was getting very frustrated.
With that frustrating stage done, my phone decided to not boot into HBoot consistently. I believe this might be specific to my device but I had to restart the phone multiple times to get into HBoot. At this point, I didn’t really care if I bricked the phone. After a while, the problem went away. I hate things like these. Random, unexplainable problems that cannot be reproduced.
The next step was to get a third party recovery software so that HBoot can be used to execute things like installing a custom ROM. There was this big decision between two leading pieces of software and I went for the more recognized one in the end – CWM over TWRP. The main reason for doing so is because there are more write ups for CWM then there are for TWRP. Also, it was already in the early hours of the morning. I deviated from one of the guides and tried CWM’s app based interface. It worked and I was able to flash CWM’s recovery directly. At this point, I know what I am saying sounds like greek. Trust me, after doing this successfully, it still sounds like greek to me.
Now that CWM was up and running, my phone finally completed the root process. The sequence of events in this section is something you won’t find in other guides. This is because none of the guides worked for me. As I said earlier, I had to take risks.
Custom ROM and Kernel
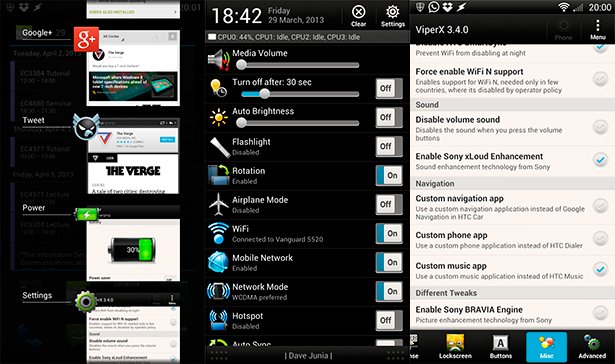
At this point, it was like 2:30am and I had to wake at 8:30am for church (Good Friday). But why go through 3+ hours of frustration and still use an unmodified ROM? I decided to get the safest and most recommended custom ROM for the One X. ViperX is a modified Sense based ROM which was recommended to the high heavens. I tried googling for negative reviews and nothing serious came up. That is how highly recommended this ROM is. I wanted a stock Android experience but the Cyanogen options were poor and bug ridden for the One X. So ViperX it was.
Installing a custom ROM and kernel is rather easy as compared to the amount of trouble rooting was. Pop the files into internal SD card, boot into HBoot and recovery and then install it from there. After installing, do a clean wipe and then return to HBoot. Everything in that previous sentence was done under CWM’s recovery. It was quick and seamless thankfully.
Initially, I had forgotten to flash the boot.img file and my new custom ROM worked really poorly. Googling around quickly informed me that I had to execute a fastboot command to flash the boot.img. So, I got back to HBoot which I had seen so many times in the past few hours and executed the command via my PC (through the USB cable). As I was soon approaching prospects of a shorter than 4 hour sleep session, I decided to use a custom kernel for the boot.img file.
And it worked. Everything ran like butter. Finally.
Results
At the point of writing, the custom ROM (ViperX) with a custom kernel has been working without a hitch for the past 24 hours. Battery life has improved, back to what it was before. System performance is smoother than HTC’s butter. I have nothing to complain besides the fact that I had to reinstall all my apps and the whole nine yards.
I am surprised at how cool the phone operates at. This phone does heat up quite a bit under load previously but I have yet to experience the same even though I have placed it constantly on high load when reinstalling everything.
Battery life has improved, back to what it was before. System performance is smoother than HTC’s butter.
The tweaks that ViperX made are very welcome. Quick settings page in the pull down status bar, the ability to switch the default music player, changing the application switcher and lock screen to stock Android are just a few of the many new options. There are obviously many advanced tweaks that I personally cannot comprehend. As of now, I am happy with the speed and battery performance of my One X. It does feel like I have breathed new life into it.
Frustrating But Rewarding
Unlocking, rooting and installing a custom ROM can be very frustrating. I did reach a point where guides could not help me and I didn’t have time to wait for answers on XDA.
I would recommend rooting your phone if you are unhappy with the current performance and if your warranty has expired. There’s nothing to lose then and you could very well give your phone that needed second wind. I might have saved myself from buying a new phone for the next six to twelve months.
For more posts like these, follow @davejunia on Twitter.